I have a Dobro. I want to take the neck off. Does anyone know how I can do this???
Thanks in advance,
Wayne Baker
Dobro Disassembly
Moderator: Brad Bechtel
-
Wayne Baker

- Posts: 932
- Joined: 13 Aug 2001 12:01 am
- Location: Altus Oklahoma
- State/Province: Oklahoma
- Country: United States
-
Alan Brookes

- Posts: 13227
- Joined: 29 Mar 2006 1:01 am
- Location: Brummy living in Southern California
- State/Province: California
- Country: United States
It all depends which model. Dobro have been making resonator guitars for many many years now, and they're not all put together the same.
Generally speaking, guitar necks are glued. You have to insert hot steam into the joint. Luthiers do this by drilling a tiny hole into the joint and using a steam injector, which you won't have. If I were you I wouldn't even attempt to remove the neck unless you have one of the cheapo guitars which Dobro are currently putting out, and then you'll have less to lose when you mess it up.
Do you want to change the neck ? I say this because, if you don't want to reuse the old neck you can be a lot more destructive in the process and concentrate on making sure that the body doesn't get damaged or marked.
Sorry to put the damper on the project. But prewarned is pre-armed.
-
Ulric Utsi-Åhlin
- Posts: 618
- Joined: 28 Dec 2008 9:12 am
- Location: Sweden
- State/Province: -
- Country: United States
If it´s a square neck You´ve got...
The trad Dobro necks are not set(glued-in);a neck
extension,long or short pole,is inserted from the
heel-side and rests on a block inside ; to take the
neck off,You have to remove 2 or 4 of the highest
position dots to get to the screws that secure the
fretboard to the top of the guitar.McUtsi
extension,long or short pole,is inserted from the
heel-side and rests on a block inside ; to take the
neck off,You have to remove 2 or 4 of the highest
position dots to get to the screws that secure the
fretboard to the top of the guitar.McUtsi
-
chris ivey

- Posts: 12703
- Joined: 8 Nov 1998 1:01 am
- Location: california (deceased)
- State/Province: -
- Country: United States
-
Bryan Bradfield

- Posts: 729
- Joined: 29 Apr 2003 12:01 am
- Location: Lethbridge, Alberta, Canada.
- State/Province: -
- Country: United States
To add to what Ulric & Chris just said, I would pop out the pearl dots on frets 15 & 19, 2 dots at each fret, remove the 4 flat-head wood-screws, then remove the neck rod screw, and then just gently rock the neck downwards ever so slightly so that the fretboard extension will lift. This will ensure that there is separation of the fretboard extension from the top of the guitar.
-
Alan Brookes
- Posts: 13227
- Joined: 29 Mar 2006 1:01 am
- Location: Brummy living in Southern California
- State/Province: California
- Country: United States
-
Bryan Bradfield
- Posts: 729
- Joined: 29 Apr 2003 12:01 am
- Location: Lethbridge, Alberta, Canada.
- State/Province: -
- Country: United States
Alan -
If one was committed to removing a resophonic guitar's neck, one would remove the coverplate and cone first. That would allow a look at the method of attachment in the interior. I've not looked into the innards of any imports, or any modern American makes, but all of the pre-war (WWII) American-made resophonics I've looked at have had neck rods coming into the bodies, rather than dove-tail neck joints.
If one was committed to removing a resophonic guitar's neck, one would remove the coverplate and cone first. That would allow a look at the method of attachment in the interior. I've not looked into the innards of any imports, or any modern American makes, but all of the pre-war (WWII) American-made resophonics I've looked at have had neck rods coming into the bodies, rather than dove-tail neck joints.
-
Wayne Baker
- Posts: 932
- Joined: 13 Aug 2001 12:01 am
- Location: Altus Oklahoma
- State/Province: Oklahoma
- Country: United States
Dobro Neck Removal
Awesome. Thanks for the help guys. Gibson said it would cost $1100 to reset the neck. I don't really have an extra $1100 laying around. Although I would love to be able to send it to them, I think, or hope I can do it my self.
Wayne Baker
Wayne Baker
-
Bryan Bradfield
- Posts: 729
- Joined: 29 Apr 2003 12:01 am
- Location: Lethbridge, Alberta, Canada.
- State/Province: -
- Country: United States
A neck reset MIGHT be very simple. In a traditional dobro, the neck rod extension is screwed (one screw) to a block that is glued to the back. Often, there is a shim between the rod and the block. The screw then runs through the shim. In fact, the factory used shims in a variety of spots to speed parts alignments, including the body opening where the neck rod goes into the body. It's been stated that the 3 holes in the top between the cover plate and the fingerboard were there so that one could insert a screw driver through the middle hole, while manipulating a shim held by tweezers through one of the outer holes.
Anyway, if the guitar neck has pitched forward, creating a larger spacing between neck and strings than is desired, the fix would be to insert a shim, or larger shim between neck rod extension and the block on the back.
There would be no need to remove the pearl dots or screws in the fretboard.
Anyway, if the guitar neck has pitched forward, creating a larger spacing between neck and strings than is desired, the fix would be to insert a shim, or larger shim between neck rod extension and the block on the back.
There would be no need to remove the pearl dots or screws in the fretboard.
-
chris ivey
- Posts: 12703
- Joined: 8 Nov 1998 1:01 am
- Location: california (deceased)
- State/Province: -
- Country: United States
on my 1975 model 60N squareneck dobro there is a wooden shim between the block inside and the neck extender piece.loosen the screw that goes through the neck piece and hole in shim. the shim is wedge shaped so as you tap it in to get the fatter shim under the joint, it pulls the neck tighter against the body. really very simple when you look at it. i can't believe gibson would rip someone off for $1100 for this...oh...yes i can..
-
Jerry Overstreet

- Posts: 14846
- Joined: 11 Jul 2000 12:01 am
- Location: Louisville
- State/Province: Kentucky
- Country: United States
I've had a couple 60D OMI squarenecks apart. The necks were not glued in. A long neck stick or spline inserted into the body with a bolt or a screw to hold it.
I replaced the neck shim on one of them to straighten out the neck alignment. It was easy. The spline is in plain sight after removing the cone. Just took out the
screw, pulled out the shim and put in a thicker one.
I didn't know there were any screws holding it to the top...it felt like I could just lift the whole thing out of the pocket. I defer to the other guys who refer to fretboard screws though. If that is the case, I suppose too much adjustment could cause the top to belly out?
Unless it has already been done, this might be a good time to make sure the spider and cone mate well and to do any other mods or upgrades you might be considering.
Caution on reassembly: Be careful not to tighten the cone tension screw too tight. The aluminum cones are pretty fragile and easy to damage.
Here is some info from Stewart McDonald re: cone/spider assembly, setup, etc. Best of Luck
http://www.stewmac.com/freeinfo/instrum ... setup.html
-
Wayne Baker
- Posts: 932
- Joined: 13 Aug 2001 12:01 am
- Location: Altus Oklahoma
- State/Province: Oklahoma
- Country: United States
Dobro Fixed
Hey guys, this really worked out well. I removed the wedged shim, pushed it back a little, driiled a new hole, and problem solved. I appreciate all the advice.
Wayne
Wayne
-
Ulric Utsi-Åhlin
- Posts: 618
- Joined: 28 Dec 2008 9:12 am
- Location: Sweden
- State/Province: -
- Country: United States
-
John Billings

- Posts: 9344
- Joined: 11 Jul 2002 12:01 am
- Location: Ohio, USA
- State/Province: Ohio
- Country: United States
-
Bryan Bradfield
- Posts: 729
- Joined: 29 Apr 2003 12:01 am
- Location: Lethbridge, Alberta, Canada.
- State/Province: -
- Country: United States
-
Madeline Dietrich

- Posts: 27
- Joined: 6 Jun 2019 9:22 am
- Location: Virginia, USA
- State/Province: West Virginia
- Country: United States
I came across this thread while searching for solutions for the neck separating slightly from the body of my 1990 Dobro Hound Dog. I wasn't able to visualize exactly what it looks like based on the helpful descriptions above, so I snapped a couple of pics while I was working on mine in case someone in the future ends up reading this thread. I ended up adding a shim under the wedge to add height. The adjustment was enough to close the gap between the heel and neck, and it sounds as good as it did before I started messing around with it.
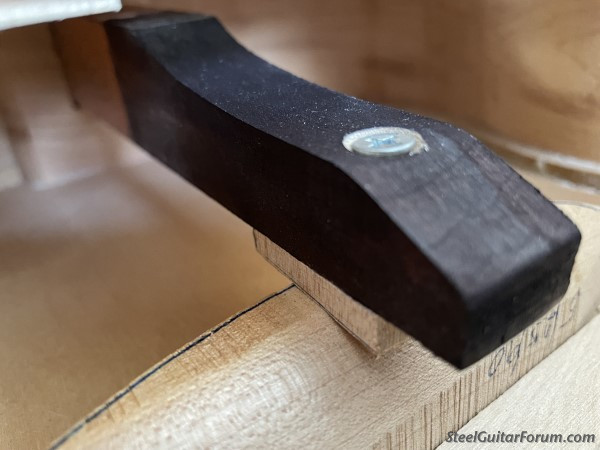
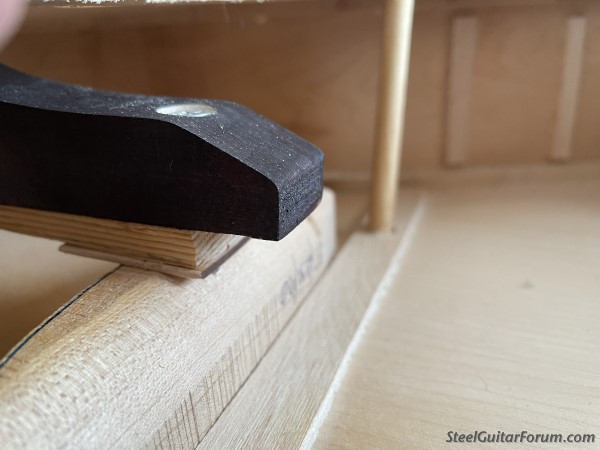
In truth, I actually did make a new wedge using a hack saw, vise and sandpaper, and made it longer in case I would need to move it in further someday. But my new wedge ended up only barely thicker than the original (after 30 minutes of destroying a picture frame for the wood--I always try to do these things with material on hand, and this all in my living room and I had dinged my knuckle pretty good with the hack saw), and by then I was tired of trying to do semi-precision work with a hacksaw) so I ended up using a shim along with the wedge. Not my best work but satisfactory.
In truth, I actually did make a new wedge using a hack saw, vise and sandpaper, and made it longer in case I would need to move it in further someday. But my new wedge ended up only barely thicker than the original (after 30 minutes of destroying a picture frame for the wood--I always try to do these things with material on hand, and this all in my living room and I had dinged my knuckle pretty good with the hack saw), and by then I was tired of trying to do semi-precision work with a hacksaw) so I ended up using a shim along with the wedge. Not my best work but satisfactory.
-
Andy Volk

- Posts: 10526
- Joined: 4 Aug 1998 11:00 pm
- Location: Boston, MA
- State/Province: Massachusetts
- Country: United States
Steel Guitar Books! Website: www.volkmediabooks.com
-
Jerry Overstreet
- Posts: 14846
- Joined: 11 Jul 2000 12:01 am
- Location: Louisville
- State/Province: Kentucky
- Country: United States
I did the same thing to an '88 60D several years ago. Not as severe as yours but still did the trick.Madeline Dietrich wrote:I ended up adding a shim under the wedge to add height. The adjustment was enough to close the gap between the heel and neck, and it sounds as good as it did before I started messing around with it.
-
Eric Dahlhoff

- Posts: 998
- Joined: 25 Jan 2010 1:04 pm
- Location: Point Arena, California
- State/Province: California
- Country: United States